


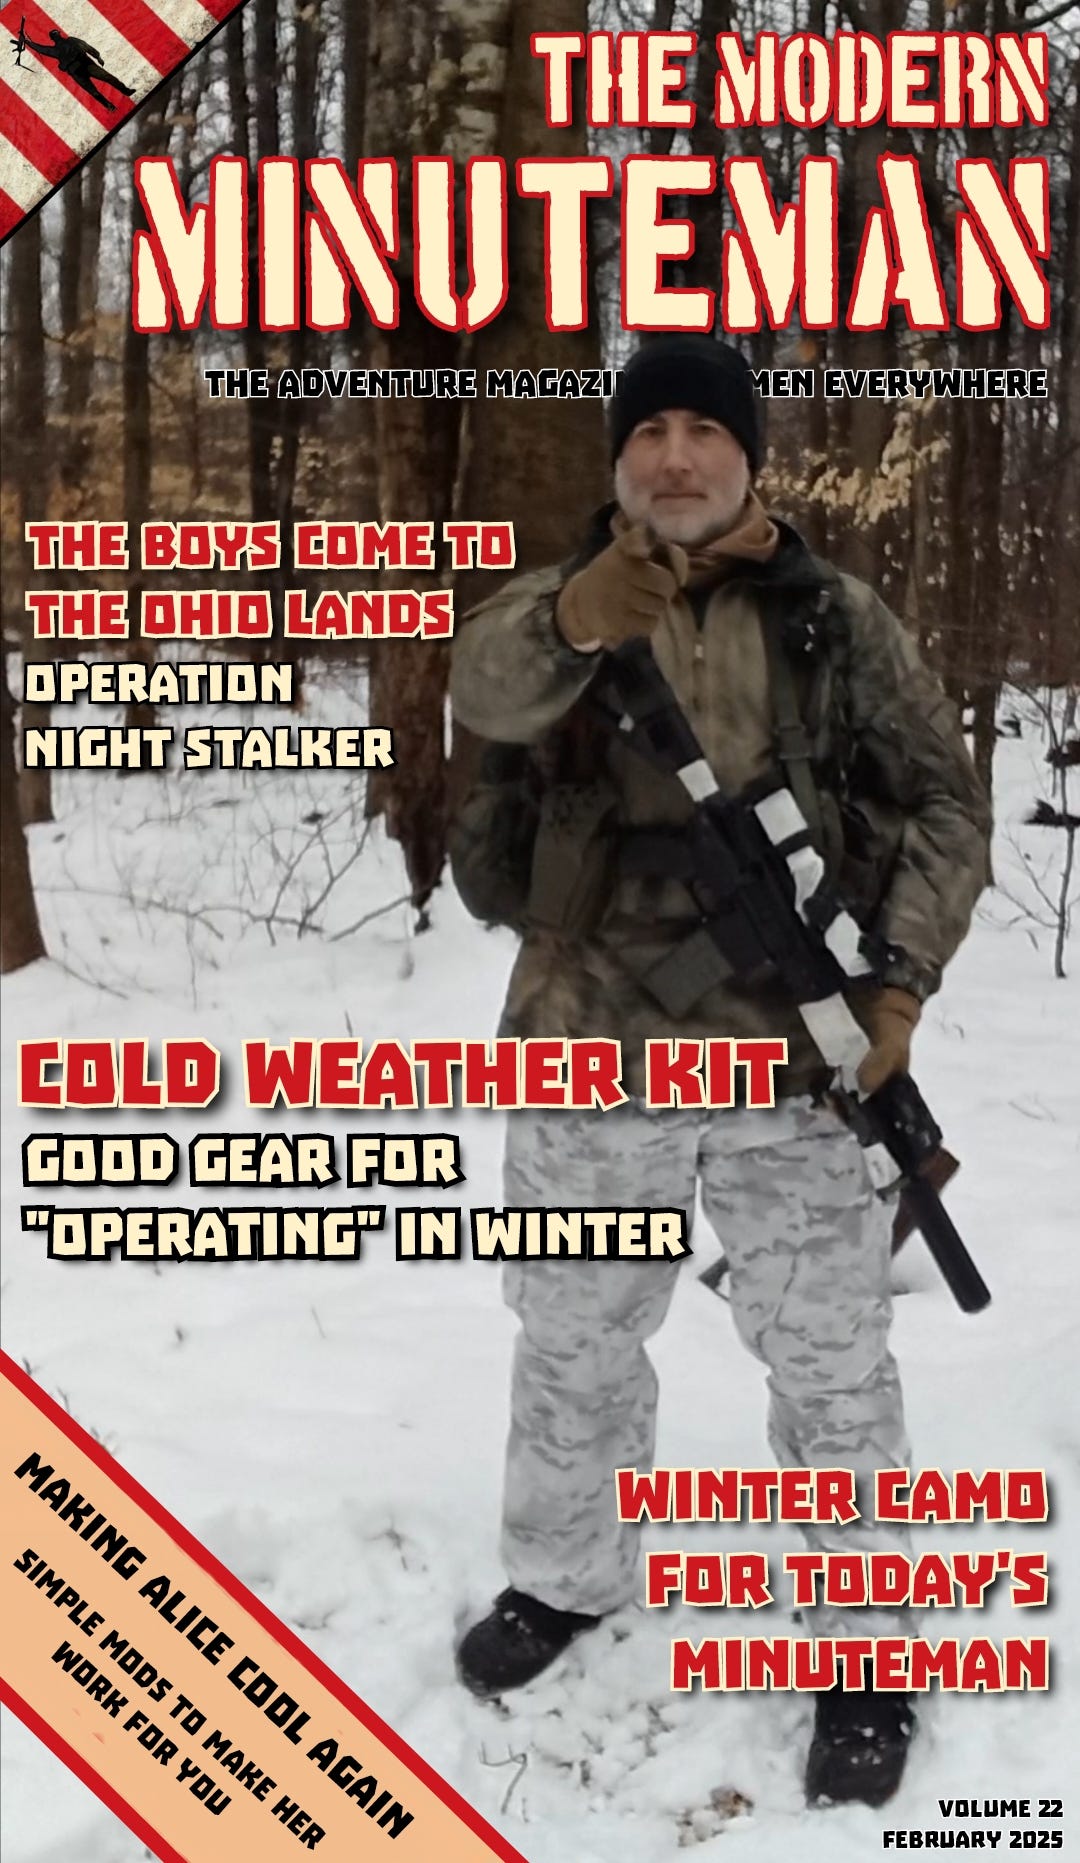
THE MODERN MINUTEMAN Volume 22, February 2025
Operation Night Stalker AAR, Winter Camo, Cold Weather Kit, and making ALICE go bang again...

MAKING ALICE COOL AGAIN
I have had the opportunity to use a lot of packs throughout my climbing and backpacking years, some being very good and others being really bad. I’ve owned and abused packs from Dana Designs, Mystery Ranch, Arcteryx, Lowe Alpine, Patagonia, Black Diamond, and many more. And in my uses today I’ve had different bergens, ALICE, Mystery Ranch, LAPG, Condor, Hidden Woodsman, and others and for some reason I just keep bouncing back to our girl ALICE.

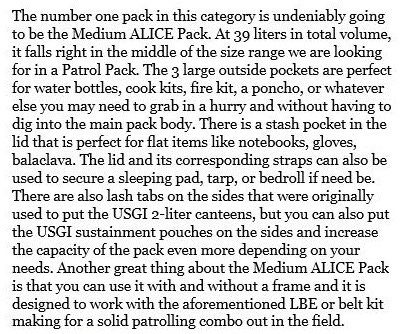
ALICE stands for All-purpose, Lightweight, Individual, Carrying Equipment and the Medium ALICE pack was first issued in 1973 and wasn’t replaced until 2001.
Some quick specs:
Main compartment 19 inches x 11.5 inches x 9.5 inches
Three pouches (5 inches x 2.5 inches x 9 inches)
Main compartment capacity (approximately): 34 litres (2075 cubic inches)
Total capacity (approximately): 39.52 litres (2412 cubic inches) – this is maximum volume of all the compartments
Separate pouch inside large main compartment
Accessory loops for storing extra gear (12 on the top front under top flap, 2 on bottom, 3 on each side)
Capacity: 39.5 litres / 2413 cubic inches
If you’ve read my books, you will have seen that I have the Med ALICE listed as a go-to option for a Patrol Pack.
For the first couple of years I used it without a frame. It wasn’t bad but I have definitely had better carrying packs. So I shelved it in the Hooch and forgot about it while I used other “tactical” patrol packs. Then 2 years ago I pulled old ALICE out to carry in my first Norwegian Foot March. I figured if soldiers were using ALICE in this that I could too. So with a pack weight of 34 lbs I did the 18.6 miles in my time allotment and was surprised that it really wasn’t so bad. So I went about trying to improve her with a relatively simple modification called the “Bobcat Mod” that was published by the Liberty Tree Blog and it seemed like a simple improvement. So I used it for awhile and then abandoned ALICE again in favor of the latest, sexy tactical patrol pack.
Fast forward to to last year and I decided to once again ring up trusty ALICE and help her out by making a PVC frame to help prop her up and help add a little support for her (and me) and low and behold she felt great again. So she was put back into action on our property patrols and, once again, she became my main squeeze.
But I wasn’t done yet… I felt like I wanted a couple more pockets for organization and quick access to bits of kit, so I found two Molle side pockets that fit on the side sewn straps perfectly and decided that the faded OD green she wore could use an update, so armed with a can of Rustoleum I rattle canned her a beautiful Dk Forest Green and she now has a certain sexiness to match her proven, battle worthy design.
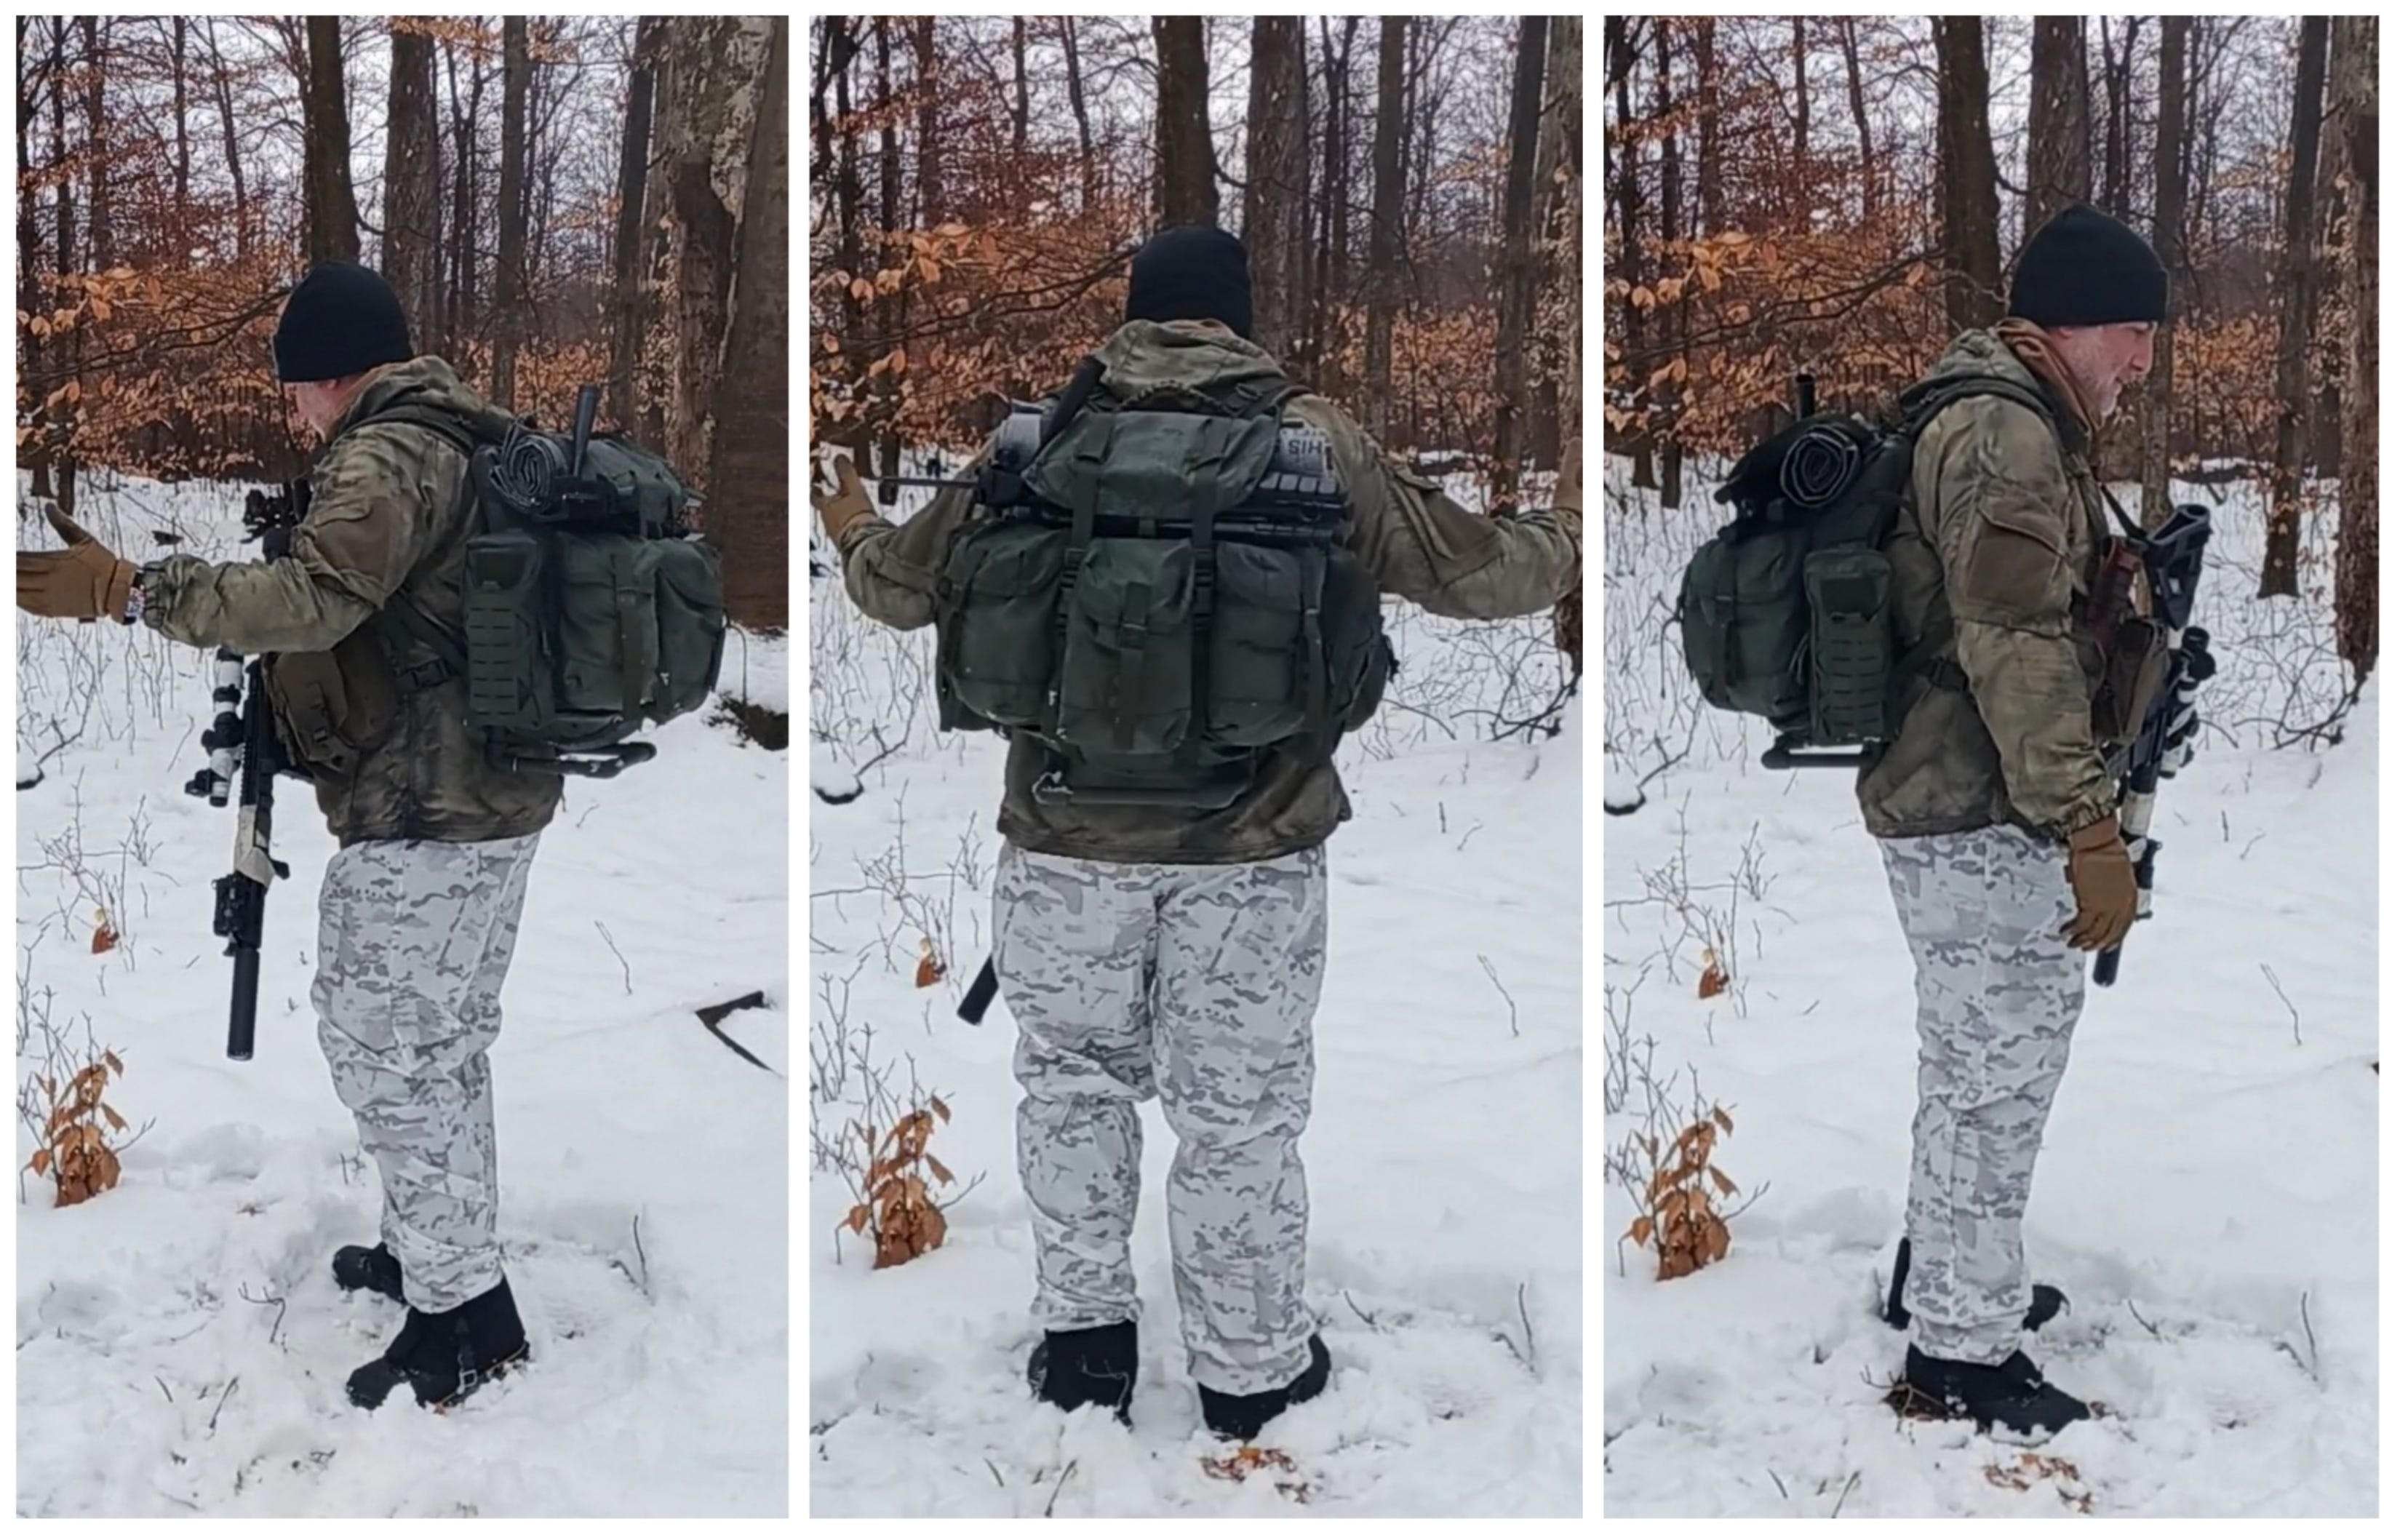
ALICE is HOT again and deserves a spot in every Minuteman’s selection of packs. Remember, 1-3 day reconnaissance patrols will likely be the most common type of patrolling that we will do, and ALICE does it very well.
Minuteman note: ALICE packs can be found all over online and in all kinds of conditions. Ebay, Army Navy Stores, even Amazon will have them. There are also tons of ways to modify them to suit your needs the best. I highly recommend looking into one if you are struggling to find a proper pack for patrolling.
COLD WEATHER KIT & PHILOSOPHY
Good Gear and Practices for “Operating” in the Winter
I’ve been lucky to have been able to play in the cold and snow for a very long time and have learned a lot when it comes to how to stay comfortable in those kinds of conditions. So a lot of that experience and knowledge I have been able to transfer right over into the Minuteman realm of doing things. All the rules still apply, just in a more “tactically Operational” manner. So let’s highlight a few things that came to mind over this past weekends FTX…
Good Gear:
Socks… I can not stress enough the importance of good socks. Merino wool started to take over the outdoor sock industry 30 years ago and now they are available just about everywhere. Your socks are going to get wet, if not from outside moisture then definitely from your own perspiration. Be prepared for this with spare dry socks in your pack along with foot powder. I believe in the rule of 3’s for socks. One pair is on your feet, one pair is drying because I changed out of them, and one pair is dry in my ruck and I simply rotate. On winter trips you can’t go wrong with 4 or 5 pairs, you know, just in case!
Wind Shirts… I learned about windshirts during my early climbing years. A good wind shell keeps the cold wind and light moisture off of you while still allowing for you to breath while under load and movement. The better your body can breath the less heat buildup you will get thus allowing you to go further, faster, and doing so more comfortably. Plus they take up very little space with many fitting in a GP pouch on your kit. I have worn mine in everything from windy 75 degree days down to single digits in blowing snow. They are truly a must have item in your layering system (more on the layering system below).
Boot Gaiters… There is nothing worse than getting snow packed down into the top of your boots. Your pant legs get wet, your socks get wet, and your boot laces get snagged on branches and under growth. Then there are those damn briars and prickers below your knees that get caught and possibly even rip the lower legs of your pants. Gaiters help solve that issue by sealing your boot tops from snow and other debris and protect your lower pant legs from getting wet and/or torn. They don’t cost much and they do their job very well. I am a fan of the Outdoor Research Crocodiles and their Rocky Mountain High Gaiters.
Split Rig Chest Rigs or LBE’s… These two allow for better breathability and easier layering of clothing layers underneath. Enough said.
Gloves… I can’t stress enough to pack extra gloves on cold weather/winter trips. Your gloves are going to get wet, period. Drying out a wet pair of gloves is not easy nor fast. Even if you have a hot camp they will take an hour or more to dry or you risk burning/melting them (just ask one of the guys from this past weekends FTX about that). If you are without a heat source than it can take all day to dry them with body heat either from inside your shirt or inside your sleeping bag at night. This isn’t fun, trust me. So I am a believer in the 3 glove rule (remember the sock rule?). One pair is a lightly insulated work glove, the 2nd pair is a backup pair of gloves, and the 3rd is some sort of overmitt with liners. I’m a fan of the USGI trigger finger mittens with matching wool liners. They are durable, water resistant, and you can still use your rifle with them.
*pro tip, rub Snow Seal or Aquaseal into the leather palms for extra tackiness and waterproofness.
Puff Jackets… these are the best for keeping warm in the field. Get one oversized so that you can just put it on over your kit on rest breaks, long halts, inside an OP, in camp, or even to plus up your sleep system. They are available in down, synthetic, name brand, generic, it doesn’t matter. That brings me to the next item…
Helikon Tex Swagman Roll… Guys, I can’t say enough good things about the Swagman Roll and it’s lighter cousin the Swagman Basic or the HPG Serape. It’s a warmer woobie that can be zipped for a sleeping bag, used as a bag liner, utilized as a hammock under quilt, or worn as an Insulated poncho. I’ve worn mine in OP’s, worn it as a parka at camp, as a summer bag, and I use it to plus up my sleep system. This inside my bivy and green patrol bag gets me into the teens with no issues.
Hand Warmers… Keep a few of these in your kit. Toss a couple in your sleeping bag at night, put some in your pockets, put one in each glove overnight or in your boots to keep them from freezing, they can be used to prevent draining on your batteries in cold weather, and a whole lot more…
Good Practices:
Some things to consider when working in the cold... Everything takes at least twice as long (if not longer) to do.
With that said also keep in mind that you have less daylight in which to do the things, so more has to be done in a shorter amount of time. More than 1/2 your day will be in darkness, get night vision and/or thermals.
In below freezing temperatures store your water bottoms upside down. Water freezes from the top down, so if your lid is on the bottom instead of the top you’ll be able to drink your water longer.
Start off on the cool side when heading out. Start off too warm and you will start sweating too much. This will cause you to wet out your layers (yes you can overwhelm wools and synthetics) and when you stop you experience heat convection loss as that perspiration on your skin rapidly chills when hit with the outside air. Moisture is one of your enemies in the cold. Heat loss in cold, wet weather increases the risk for hypothermia and cold injury.
Drink plenty of water. You lose a lot of moisture through breathing and sweating in the cold so maintaining fluid intake is important. Dehydration can happen quickly in cold temperatures.
Keep a metal water bottle (single walled) for putting hot water in and tossing in the foot of your sleeping bag for extra warmth. Then you also have water ready to go in the morning that isn’t frozen. Plus that bottle can be used in a fire for melting snow, boiling water, and making a brew or two.
Cold Weather Layering System (Book Excerpt from CM-9 Adverse Conditions and Environments):
Too many folks have the habit of putting on all their layers at once when heading out. Problem with this is you end up overheating in the first 10 minutes and have to stop to shed layers. So now you’re just started and you’re having to stop (along with everyone with you) to take things off, put the extra layers away in your ruck, and then start up again. So now you’re hot, tired, and frustrated. So let’s look at the layering system and how it works in cold weather.
The following text is from CM-9 Adverse Conditions and Environments:
“Clothing helps you to stay comfortable by creating a thin insulating layer of warm air next to your skin. The enemies of comfort-rain, wind, and cold-work against this protective air layer.
“Comfort” is usually a relative term for anyone who has had to endure harsh conditions. Inclement weather often forces soldiers, outdoorsmen, and here our “Professional Citizen” to endure conditions that can deteriorate far below most people’s concept of comfortable. The key to maintaining relative comfort is to stay dry, or when wet, to stay warm and get dry quickly.
But your clothing serves a much greater purpose than mere comfort. In the outdoors, safety is the primary role served by your clothing. When you venture out into the remote outdoors, you sacrifice the option of quickly dashing back to civilization to escape any foul weather. Instead, you have to deal with whatever conditions exist for as long as they last.
For far too many folks, substandard clothing choices have led to hypothermia (dangerous, uncontrolled drop in body temperature) that is a leading contributor to death in the outdoors. Your clothing choices should be selected carefully to help ensure your survival through long-term exposure to cold and wet environments.
At the same time, your clothing system should be able to provide protection from overheating on hot days. Breathability and ventilation would be key features to prevent overheating which, in turn, can lead to dehydration, heat exhaustion and heat stroke.
Layering
The layering system consists of 3 main types of layers: Next to skin, insulating, and a weatherproof outer layer.
-Next to skin (underwear) is designed to allow the wicking and evaporation of perspiration keeping your skin dry and therefore warm.
-Insulating layers are designed to trap your body heat keeping you warm. The thicker this layer is, the more body heat it can retain.
-Weatherproof outer layer is your protection from the outside elements. Wind, snow, and rain will rob you of your body heat quickly if you are not protected from them.
***Hypothermia is the leading cause of death among outdoor enthusiasts. So, while cotton clothing itself does not kill, it can easily lead to hypothermia — hence why the phrase 'cotton kills' is so often used. When cotton gets wet, it ceases to insulate you because all the air pockets in the fabric fill up with water***
How the layering system works
For the above system to work it must be used correctly otherwise you won’t receive the full benefit of it. It is called a system for a reason.

Cold Weather Layering
It all starts with your base layer. Your base layer is designed to be worn snug against your skin to help in moving perspiration away from your body. As your body heats up it produces moisture and as this moisture sits on your skin it has a cooling effect on it. In the cold weather months, it is imperative to move this moisture away from the body. Examples of good base layer materials would be items like merino wool, polyester, silk, or even for extreme cold environments, a micro or stretch fleece can be worn.
Depending on the temperature and activity levels your insulation layer(s) will differ, but the important aspect of this layer is that it helps create a dead air layer which traps body heat. The thicker the layer the more of your body heat it can trap. But it also aids in the moisture transfer from your base layer away from your body, thus the system aspect of it. Materials here can include microstretch fleece, pile fleeces, light synthetic lofted pieces (think of things like the ever-popular Woobie Hoodie) and more. The idea is the more active the activity then the lighter the layer.
This now leads to our outer layer consisting of your weatherproof outer layer. This point of the layering system has been contentious over the years as people learn to understand actual uses of this layer. Everyone knows what Gore-Tex is (waterproof/breathable membrane that lets water vaper escape while preventing water droplets from getting in). But let’s face it, if you are out in below freezing conditions, do you really need at GTX shell? Probably not. Do you need to keep the wind out of your layering system so all your hard worked body heat doesn't get blown out, but the perspiration can still escape? Yes. So, a water resistant, breathable piece (Like the Helikon-Tex Windrunner Windshirt or USGI PCU Level 4 or 5 layer) makes more sense! Items like this can make for a great outer layer setup!
The important thing to keep in mind is that the more waterproof an item is the less breathable it will be, and the more active you are being the more breathable you need it to be. The goal is to prevent wind and moisture from stealing away your body heat and chilling your core.
Finally, you need your BPJ (Big Puffy Jacket) for when the **** really hits the fan. This final layer can be down or synthetic and is great for a warm camp coat or for putting over everything else (size it appropriately to fit over all your layers) when you are taking a rest break so that you don't get chilled, then take it off when you get moving again! These types of jackets are easily compressible for easy storage in your pack and can even be used as an additional sleep layer in an unexpected overnighter (remember the previously mentioned 10 essentials)! I’ve gotten through numerous unplanned bivouacs by donning a puffy jacket and stuffing my legs into a pack and been able to survive to play another day.
The difficult thing with the cold weather system is when to add or subtract layers. There is a healthy balance with which layers to have on and when. Essentially, when you are on the go, exerting yourself, you will have less layers on. If you are static for long periods of time, then you are adding layers. If it’s windy or snowing, you have your softshell or windbreaker on, if it’s raining you don your raingear. But essentially, in cold weather climates, the goal is to maintain a constant core body temperature while remaining slightly cool and dry.
Don’t forget about your head, hands, and feet! Wool watch caps, balaclavas, and neck gaiters (Buffs) will keep your head and neck warm! Mittens and gloves with enough dexterity for operating weapons and tools are essential, as well as over mitts for days in a camp or on bitterly cold periods on watch!! And your feet if your feet are in bad shape then you are out of luck! Merino wool or wool blend socks with some sort of wicking liner will help with wicking perspiration away from your feet and will keep your feet warm and dry!”
On top of this it is important to get out in the field and figure out exactly what works for you. Some folks run warmer while others get cold easily. I know that I tend to get warm easily and I also sleep warm, but this was figured out over years of trial and error out in the field. You need to get out in subpar weather conditions and test everything, and then you need to do it again, and again, and again.
THE BOYS COME TO THE OHIO LANDS
Operation Night Stalker
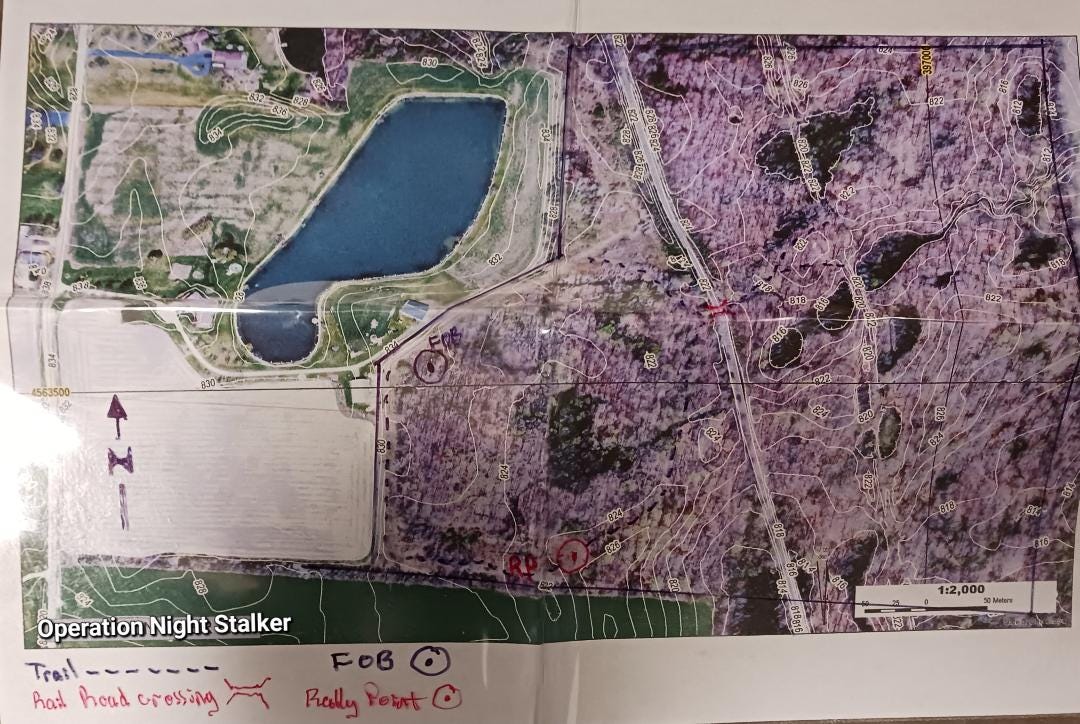
Continuing our wanting to do more networking and field training with like minded folks I had invited a couple of guys out to my camp for a weekend of cold weather training. Using my bushcamp as a sort of Patrol Base we did patrols out of camp throughout 100 acres of wooded land to practice the following skills:
Navigation: I made each person a customized topo map with an ariel overlay to use over the weekend. We had some basics indicated on it including our camp, a rally point, a few of the trails and a railroad crossing. We started off with learning to orient maps to north and then focused on navigation by terrain association (for more on this and other navigation techniques, check out CM-5 Land Navigation and CM-9 Adverse Conditions and Environments from The Professional Citizen Project). The property, while flat and featureless from above, has lots of creeks, drainages, swamps, elevation gain, and a rail line intersecting it. These features were more than enough to use terrain association to our advantage and the guys picked up on it right away and made their way pretty easily.
Hand Signals: We did a review of basic hand signals and utilized them during our patrols. Crossing Linear Danger Areas, slow down, halt, freeze, get down, SLLS (Stop, Look, Listen, Smell), and several more. In a small group it is relatively easy to use hand signals to communicate. For the most part we were above to effectively move without verbal communication. But because this was also an opportunity for learning there were lots of times we would gather up to discuss what we did, what we are going to do, and so on and so forth.
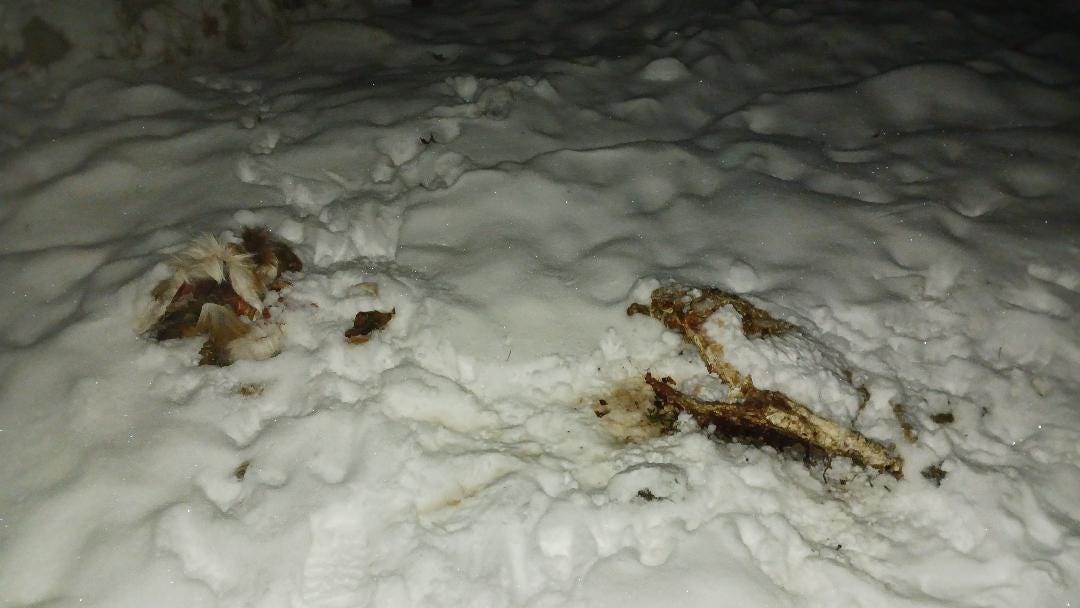
Tracking: The great thing about winter is being able to follow tracks in the fresh snow. Deer, rabbits, squirrels, fox, raccoons, and coyote tracks were plentiful on the property and they were very telling, due to the fresh snow cover, where everyone was coming from and going. Tracking also involved identifying coyote kills, game trails, bedding down areas, and more.
Night Vision usage: And then we did it all again at night under night vision. For the two guys it was their first time walking any sort of distance under night vision. They both had PVS-14’s and adjusted pretty easily. They both noticed their stride shortening while walking and that their depth perception of the ground changed a little bit, especially when traversing uneven terrain. But after a few hours they settled right in. The big thing they noticed is when you take your night vision off the dark gray or purple haze you see out of the eye that was under NV. That blur stays for a little bit but your natural sight will return back to normal. But you can see how guys can develop headaches from working under NODs for long periods of time.
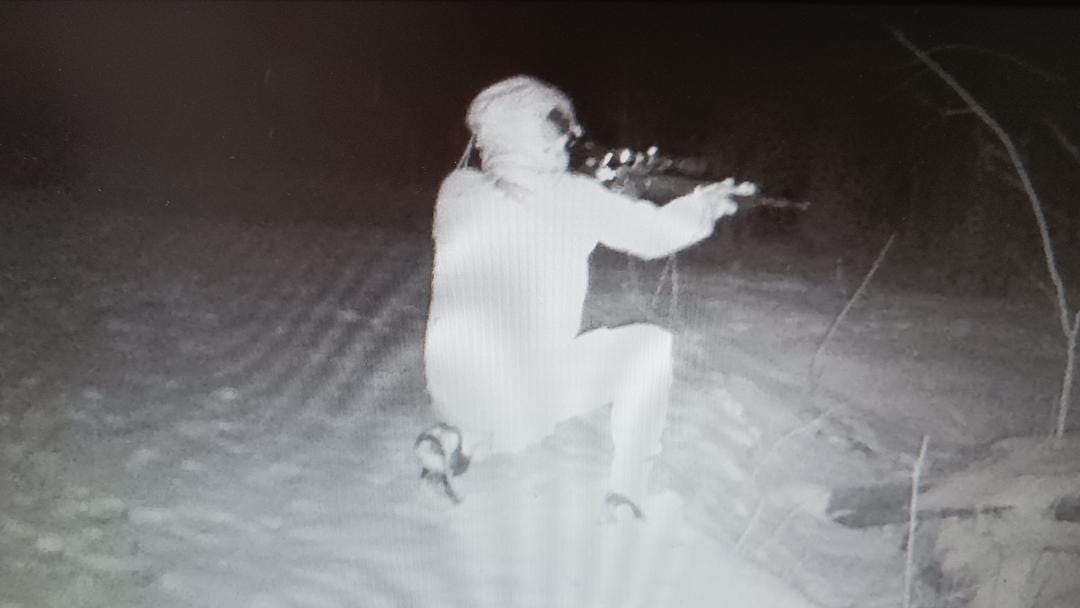
Another lesson from using night vision is when performing SLLS. It feels like you end up taking twice as long because you hear so much more and your scanning is done much more carefully. I can’t stress the importance of not just getting out during the day, but make sure you are also getting out at night.
Tracking was fun under night vision as well. Ambient light plays with the shadows created by prints in the snow and many times revealed tracks we had missed during the day. A surprise we had on night 2 was discovering more signs of the coyote activity in the area.
Working in Cold Weather: This was probably the biggest eye opener for the group. We had temperatures that ranged between 36 degrees and 18 degrees. Mother nature gave us a clear night the first night but then decided to rain, sleet, and then snow on us during the day Saturday which gave way to temps in the teens for the second night.
Camping in the winter is not for the faint at heart. It is A LOT OF WORK. Everything takes twice as long to do including cooking, getting dressed, setting up camp, and more. And then there is the non stop chore of gathering firewood, drying things out, and sometimes just staying warm. I’m blessed with a permanent camp where we have shelter, kitchen, and firepit already there. So some of that work is already done.

Sleep systems were pretty high on the list of things the guys were excited to test out. Everyone had the tried and true MSS sleep systems with bivy, green bag, and the black bag. I used my bivy with the green bag and my Swagman Roll as a liner. The system works if you set it up right. One guy had his snapped in wrong and it got twisted around the first night making him very uncomfortable and the other guy started off the night without the black bag inside but halfway through the night decided he needed it and he promptly fixed his situation. Stuff like this are the things you don’t get to experience unless you go out there and do it. I like to use the EDGE method as a teaching strategy in the outdoors where you Educate, Demonstrate, Guide, and then Enable folks to do it themselves. Enabling folks to try and sometimes fail can be a great teacher in the outdoors. The struggle with sleep systems is one such example.
So overall, it was a great weekend being in the outdoors, learning new skills and putting them to use. It wasn’t all work either, we ate well, got to do a little bit of shooting, enjoyed a few drinks, and had some great campfire conversations. All things guys need to do with each other from time to time.
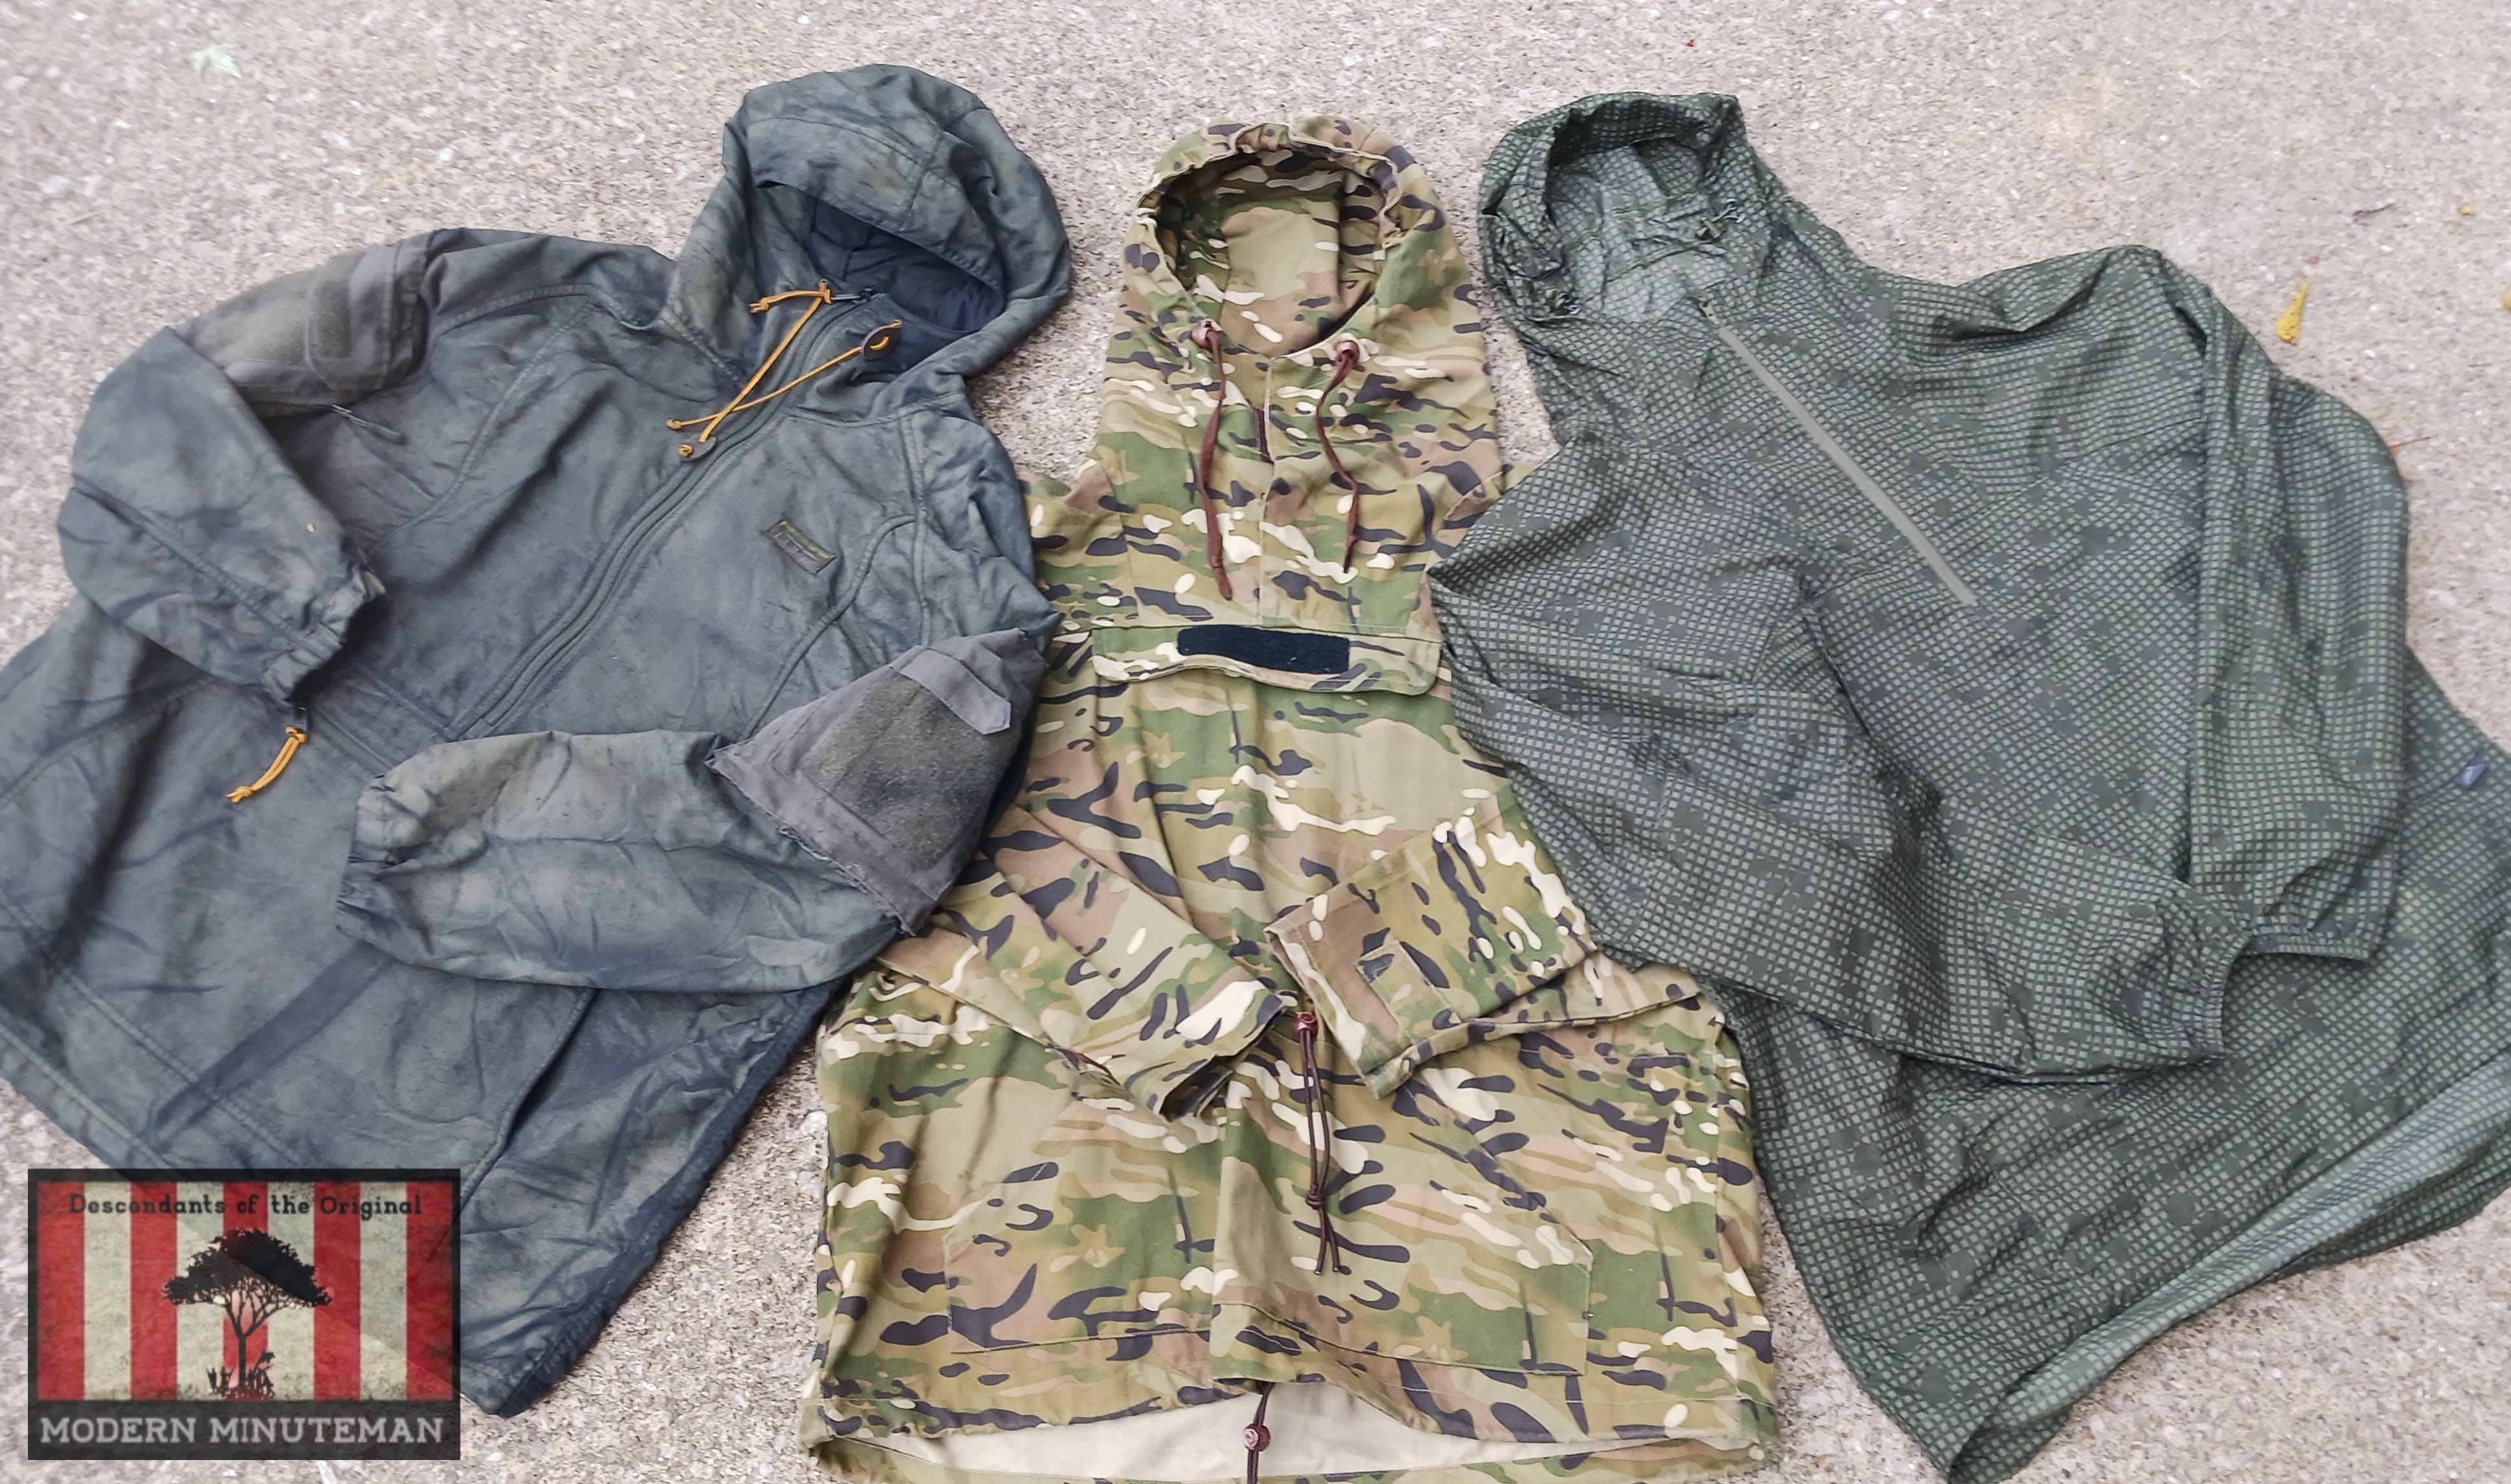
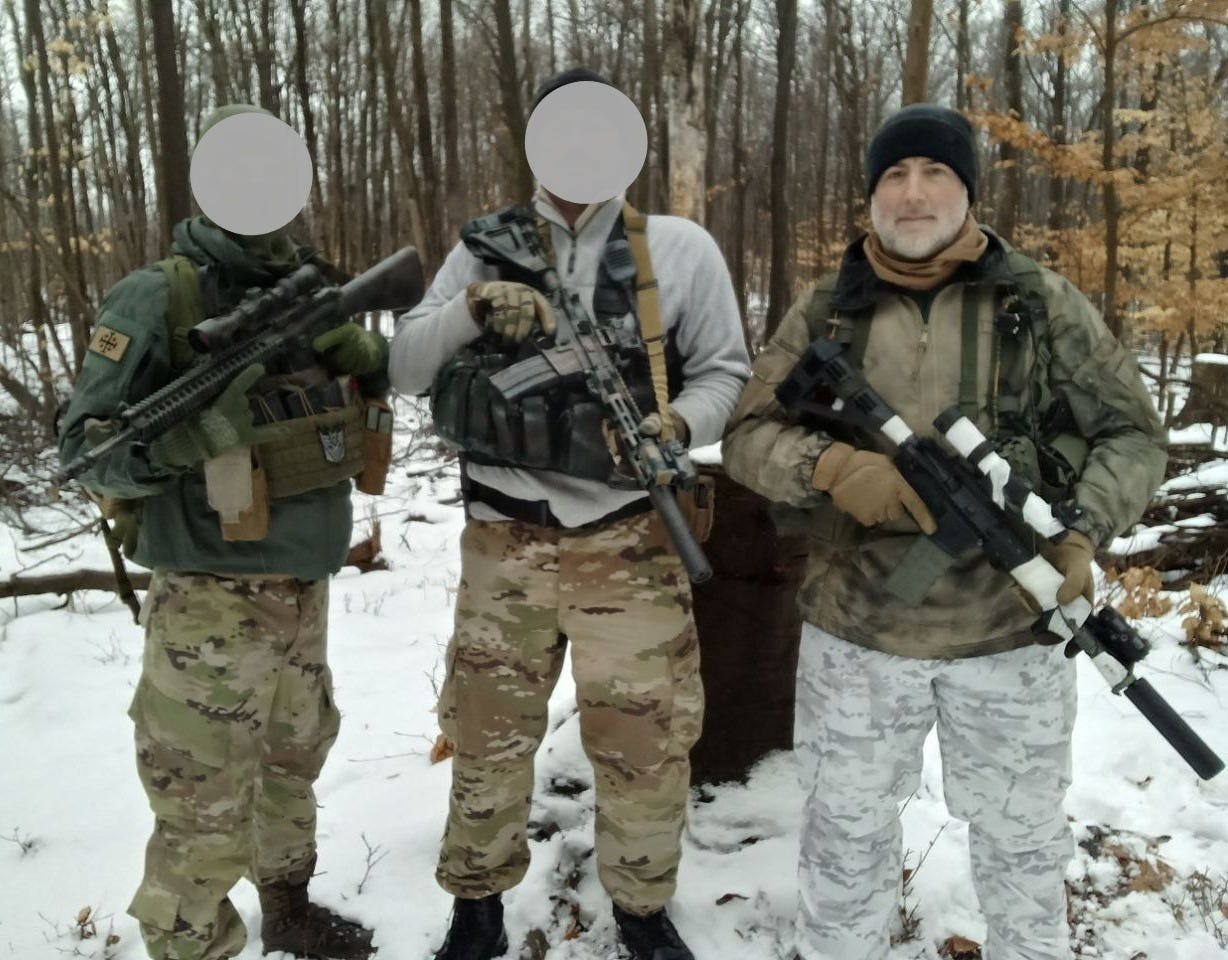
Winter Camo Considerations: You would think winter camo would be easy, but it isn’t. Not much has really changed in 100 years of modern war fighting when it comes to trying to blend into your winter surroundings. Most of us probably picture German troops in their mixed winter whites in movies and books on WW2.
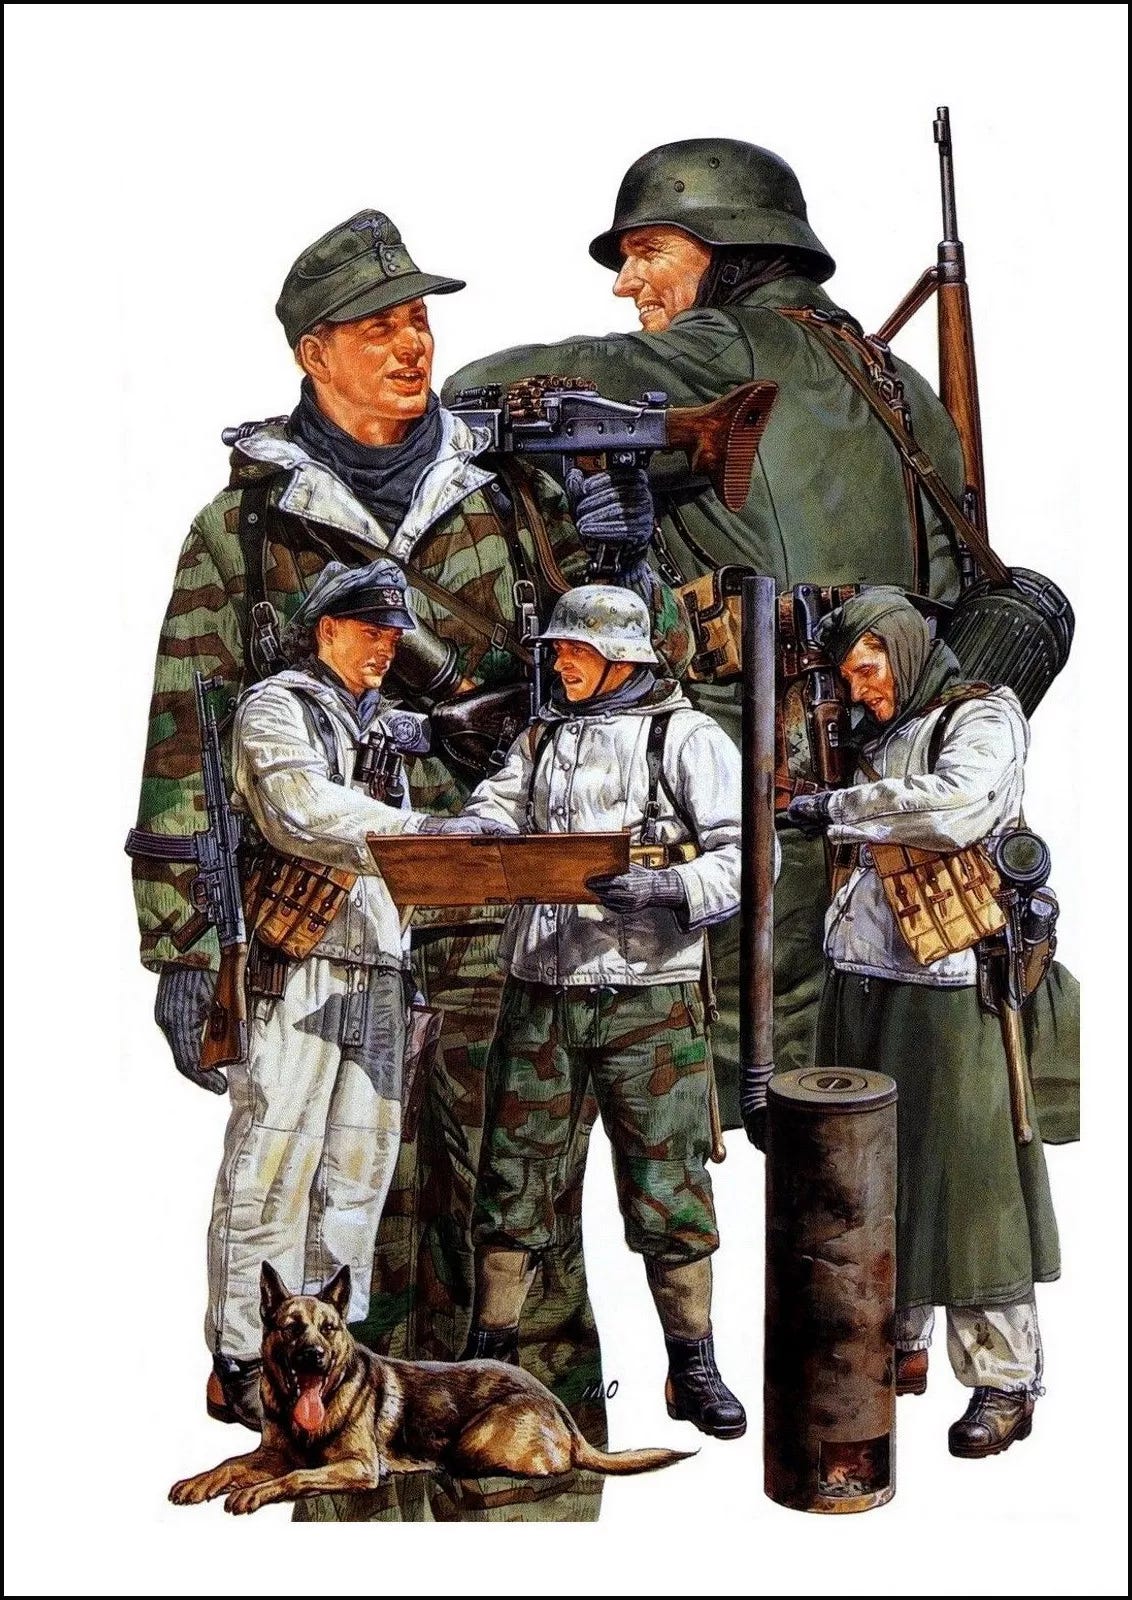
Personally, I think their examples of use are pretty spot on for the Modern Minuteman. They utilized reversible smocks, capes, jackets, pants, and any mismatching of any of the above to get their desired results. Not much has changed. I think we understand its use and implementation better but we also get to hung up on camo types instead of getting the desired results from our camo choices.
As we understand winter camo better we realize that it is not a one size fits all approach. We need to work with our surroundings and make it work for us.
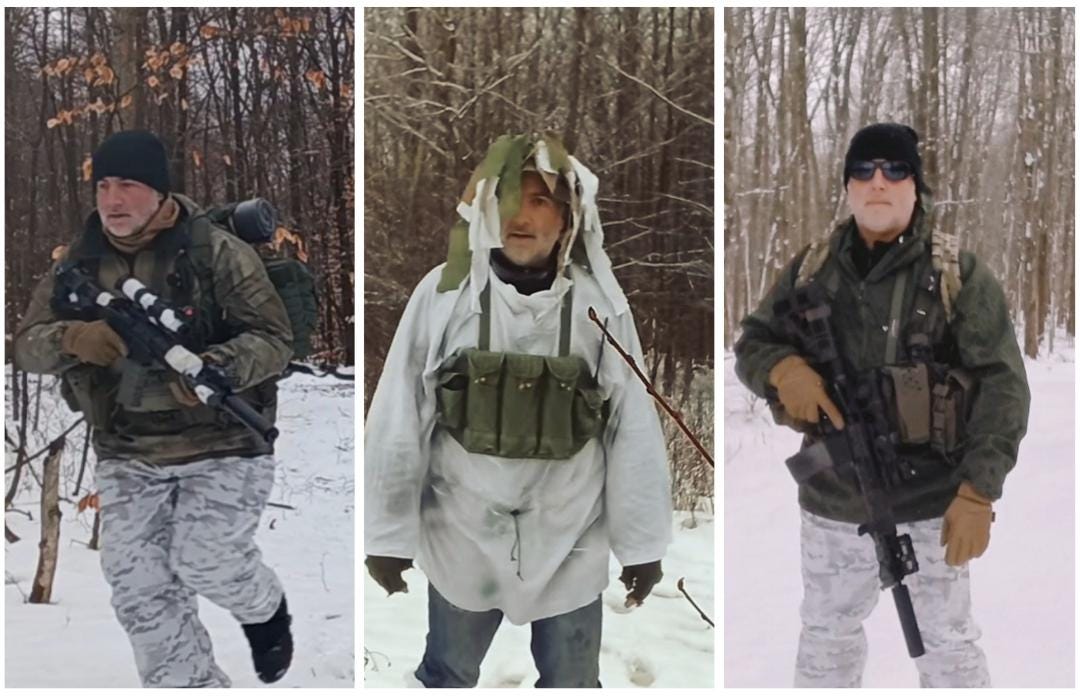
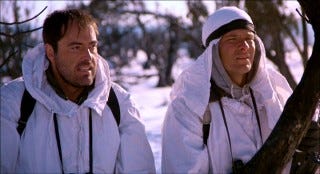
As you can see in the above picture there are a couple ways of wearing winter camo. Winter overwhites such as a jacket/pants combo allows you to mix and match depending on the amount of snowfall and the terrain you are in. The picture on the left show overwhite bottoms being worn with a dark tan top. Although there was snow on the ground the trees surrounding were void of snow. So that combo works. If you were going to be prone in the snow for any long period of time or situated in an observation post then wearing the overwhite jacket would make sense. In the middle picture we have a more traditional overwhite anorak that is oversized and can be easily pulled on and off depending on the need. This is very much like what many soldiers would have worn in WW2. In forests, trenches, and fox holes this simple top was very effective. They can be made cheaply and customized as shown in the movie Red Dawn.
You can also add snow camo’d pack covers, white netting, and more to create even more effective systems to work in a winter environment. Most importantly is go out and experiment with different setups to find what may work best for you. But remember that winter is constantly changing and what you may have in the morning may look different a few hours later. Be ready to change with it as well.
Below is a great video from our friend Grunt Proof on winter camo…
Below is our classified section which highlights tried and proven gear by yours truly. If you see it listed in the classifieds, then it has been MINUTEMAN APPROVED!
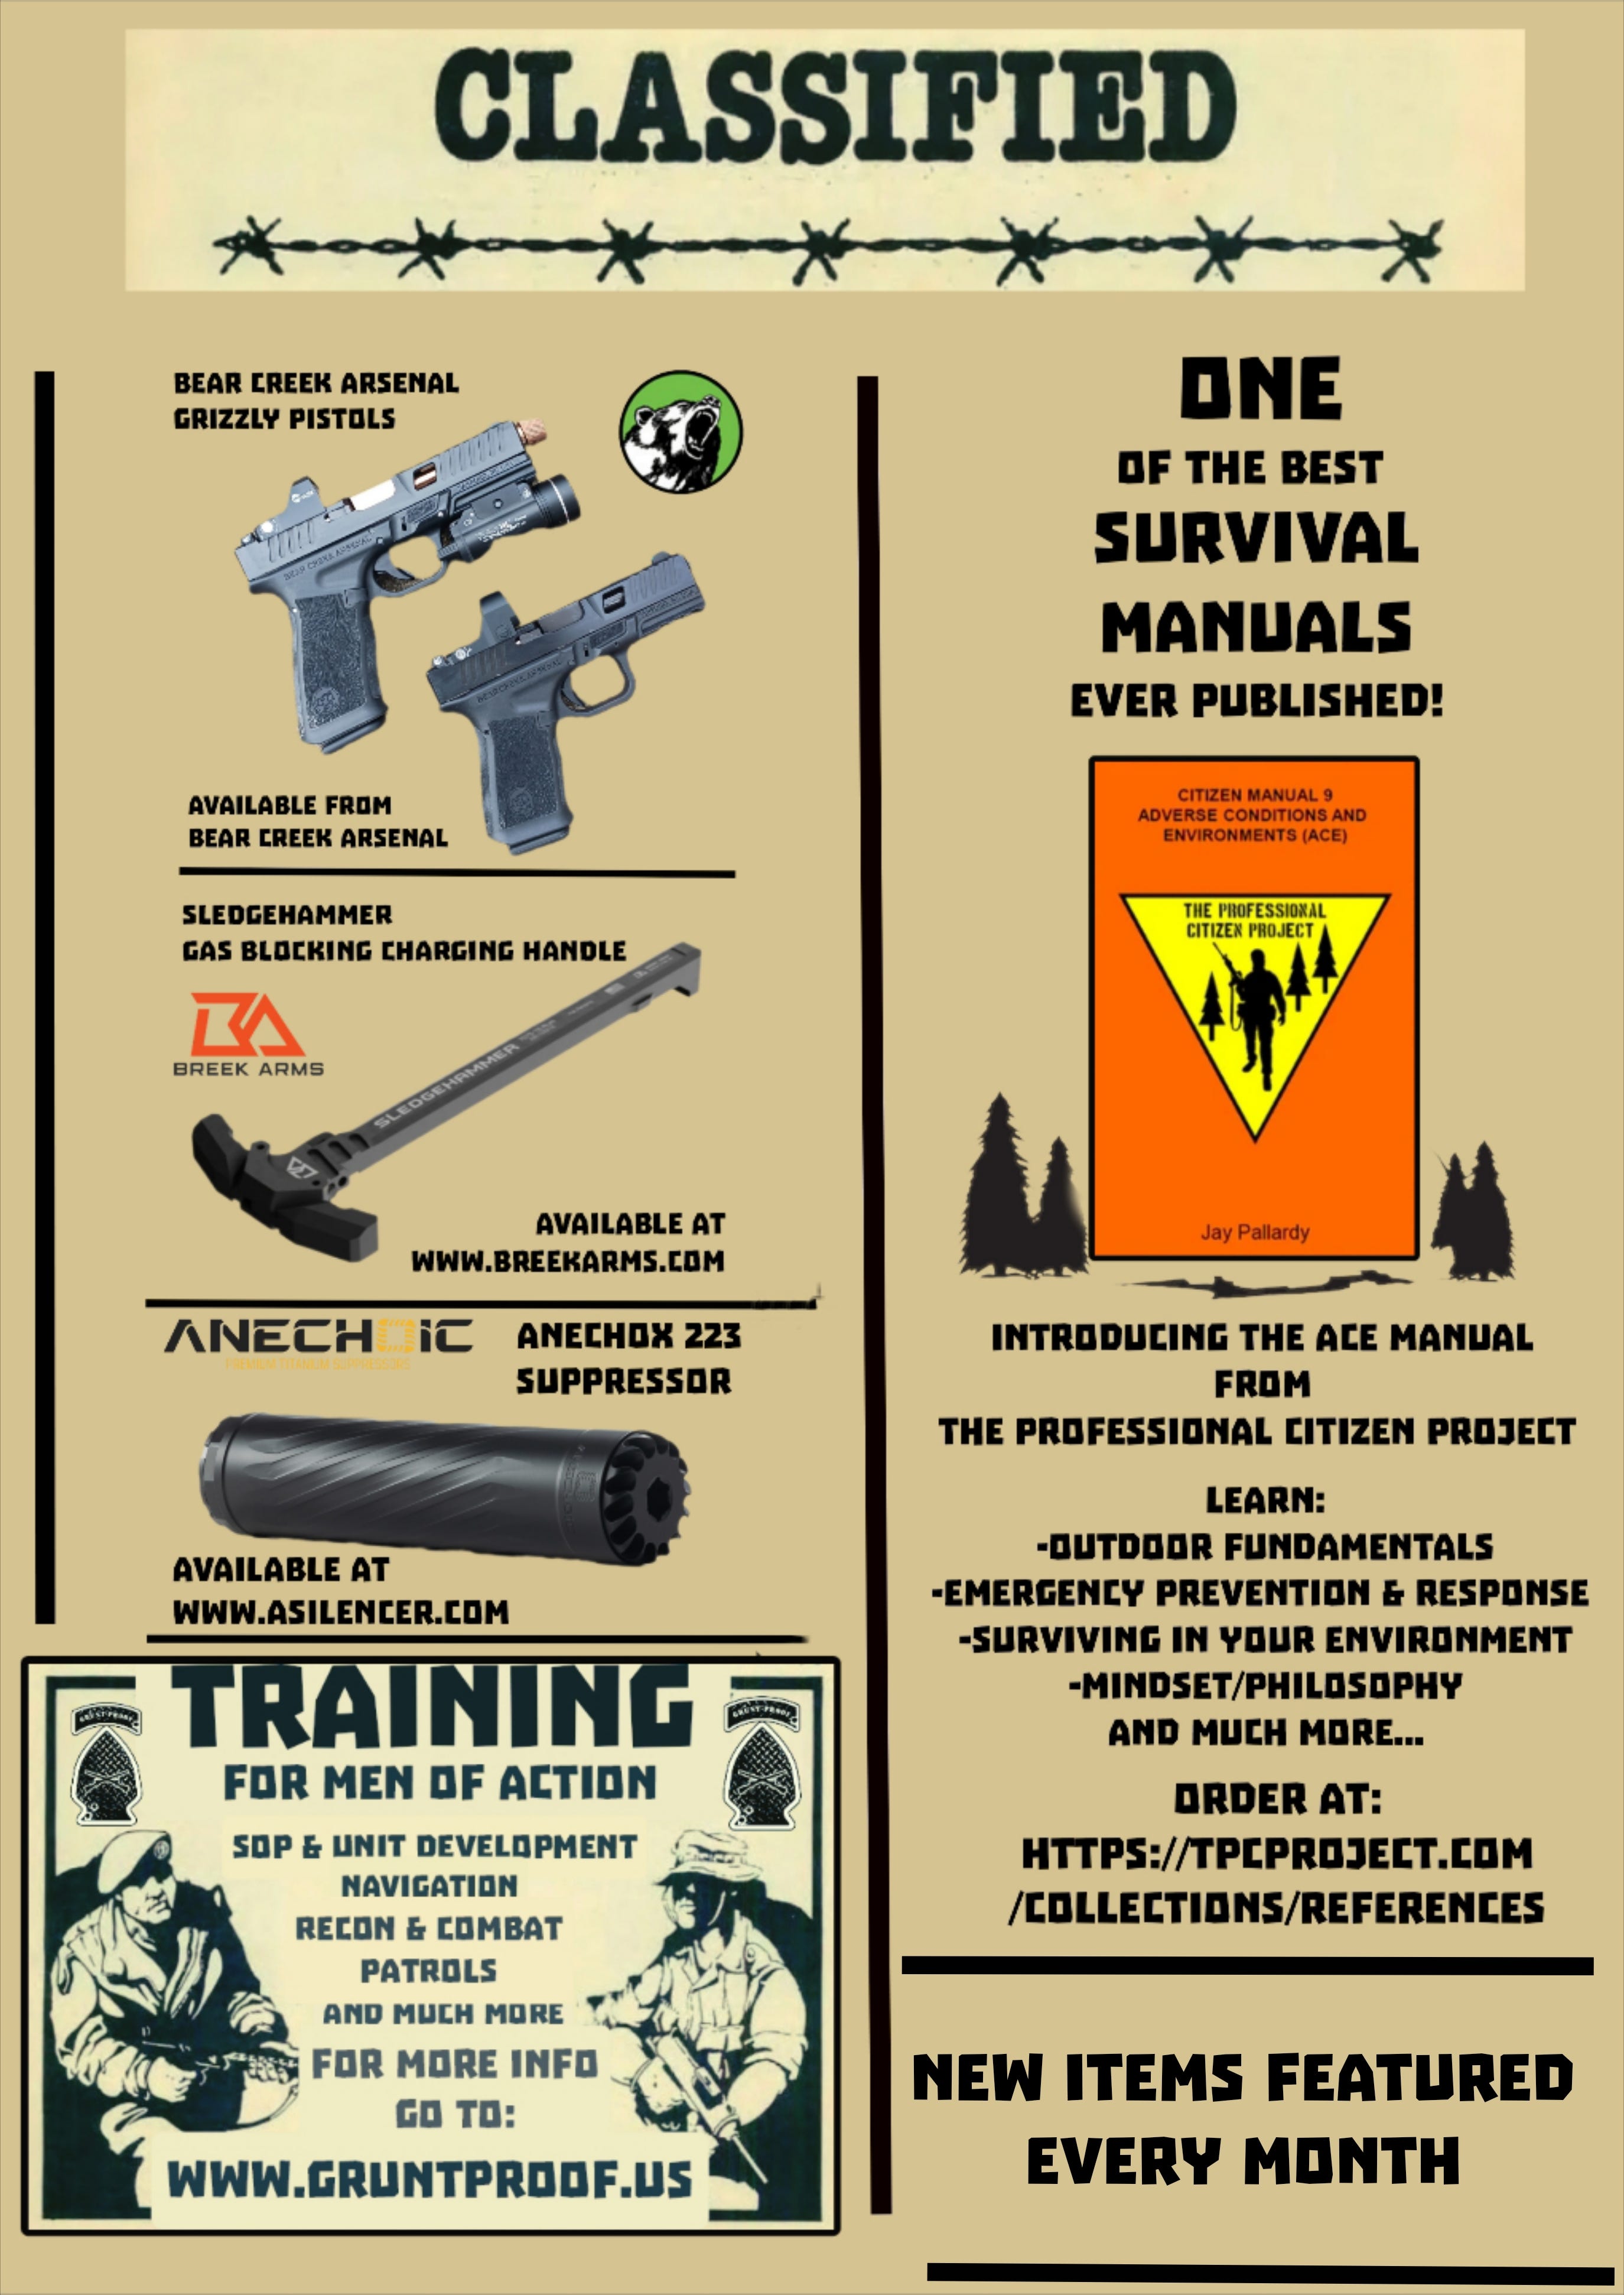
CM-9 Adverse Conditions and Environments from The Professional Citizen Project

Great advice
good stuff Jay !